In this blog post, you can know about how to export content from 2013 Exchange database file .edb mailboxes to Outlook .pst file & import data from Outlook .pst file to Live Exchange Server existing mailbox account. You can perform this task using either Exchange Admin Center (EAC) or Exchange Management Shell commands.
Export-Import Task using Exchange Admin Center (EAC):
Step 1 - Need to Create a Shared Folder

 options,


First we need to create a shared folder which in my case is 2013Data. Right Click on the Folder 2013Data & Go to Properties >


Conclusion:
We performed Export / Import Mailbox task via using Exchange Admin Center (EAC) & Exchange Management Shell in Exchange Server 2013 environment and with proper steps & accurate permission rights we turn the task easier and faster.
But if you still unable to perform Export Import procedure in Exchange Server 2013 environment or if you face any problem during Export / Import task because of database corruption, mailbox corruption etc then you can view this post https://plus.google.com/115112572193304560946/posts/a6Ft72Z5RLF, it will help to export & import content from mailboxes even in the corruption stages.
Export-Import Task using Exchange Admin Center (EAC):
Step 1 - Need to Create a Shared Folder
Now, the first step to initiate this task is to create a shared folder, you can create it anywhere in the network but I suggest you couple of things to avoid issues:
- You need to create this folder accept C: drive or any further partition in which you installed the Exchange Server, and in any partition that contain databases or log files. The reason behind this is to avoid the full disk space issue, as the conversion process take place might be the high number of pst files being generated.
- You should create a clean-up procedure/script that helps to remove the remaining files after X days.
I create a folder with the name 2013Data

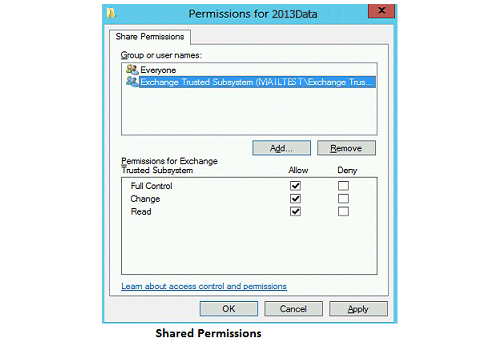
The shared folder “2013Data” must have the permission rights under Exchange Trusted Subsystem. To give the access of this shared folder to Exchange Trusted Subsystem, I need to give full control of this folder share & security level. Right click on the 2013Data folder and assign full control as you can view in the below figures:
Step 2 - Implement Import/Export Permission to the User
By default, the import/export permission is not assigned to users in an Exchange environment therefore first I need to provide permission to any user. To do that I take a user “Mark” now, I login with this user using EAC (Exchange Admin Center) and I am going to perform the following steps:
- Open EAC (Exchange Admin Center) using Browser (Internet Explore)
- Login with the User (user name and password) in EAC
- Click on Permissions
- In Admin Roles > Select the Recipient Management > View the Assigned Role & Members in the Left Pane (Now, as I already mentioned that import/export permission is not assigned to the user by default, thus you need to go on formatting tabs under Permission section & click on edit tab).
- Now, In Role Group > Recipient Management > Go to Roles Section, Click on Plus Sign

- “Select a Role” Window will Open

- Now, Select the role > Mailbox Import Export > Click on ADD > Ok
- After finish this task you can see that “Mark” user become the part of the same role group

Note: the next thing we need to check the permissions of “Mark” will work properly or not, to check it we need to logout & login again with the user from EAC and check these
If this option is not showing in the option tab then the changes are not done in the right way, you need to check the issue & fix it. Retry to activate the red marked options in the option tab.
Task 1) - Export Mailbox to Outlook PST
After assigned permissions to the user and applied changes to the shared folder, let’s logon to the Exchange Admin Center (EAC) with the user ‘Mark’. Select the desired mailbox which in my case is ‘Jonathan’. Click on the Option tab … and select the option “Export to a PST File”.
In the next step, we need to select either the mailbox or mailboxes archive content for exporting in the .pst file.
Now, we need to add the name of the .pst file and provide the full path of the shared folder “2013Data”.

On the final step of exporting to a pst file, we need to mention the user that will receive the process completion messages.
You can find the notifications via Exchange Admin Center to that user which we selected in above figure
Start and finish process message has received by the same user. In the message information we can notice that EAC sent the process completion, location of PST file & how much time was took by the process in completion.
After a successful conversion, we can open the pst file in Outlook and as you can notice that we have the recoverable items folder in the .pst file which is called dumpster in the previous editions of Exchange Server.
Task 2) - Import Data from PST file to Exchange Server
Import data from PST file into Exchange Server mailbox account is similar as the export task, first we need to select the account or mailbox in which we need to import the content of the pst file then click on this … option and choose the Import PST option.
Now on the second steps we need to provide the path of the .pst file. I store .pst file in the same shared folder that we created earlier for exporting task, folder name: 2013Data.
Select the mailbox in which you want to import the personal storage table data and click on Next.
In the final step, select the user by clicking browse button to receive the task completion messages.
Final result will message by EAC to the user.
We finished Export/Import task in Exchange Server 2013 via Exchange Admin Center (EAC), let’s see how this same task we can perform using Exchange Management Shell.
Export-Import Task using Exchange Management Shell:
Export-Import Task using Exchange Management Shell:
First we need to create a shared folder which in my case is 2013Data. Right Click on the Folder 2013Data & Go to Properties >
Select Sharing Tab > Click on Advance Sharing > Check the ‘Share the Folder’ option > Click on Permissions > Click on ADD > Write Exchange Trusted Subsystem > Click on Check Name > If you find line under the Exchange Trusted Subsystem then Click on Ok. Now, Check the all options under Allow section > Click on Apply & Ok > Again on Apply & Ok
 Now, go to Security Tab
Click on Edit Tab > click on ADD option > Enter the object name “Exchange Trusted Subsystem” > Click on Check Name > If you find line under the Exchange Trusted Subsystem then Click on Ok > Now, Check the all options under Allow section > Click on Apply & Ok
 Second, we need to allow mailbox import export permission to the administrator, as by default this permission is inactive for user.
Restart the Exchange Management Shell after assign permission to the administrator
Export Mailbox
Apply this command to export mailbox from Exchange Server 2013 environment:
New-MailboxExportRequest –Mailbox <alias name> -FilePath <UNC File Path>
Example: New-MailboxExportRequest –Mailbox Mark –FilePath \\WIN8\2013Data\Jonathan.pst
Also, we can check the progress status, apply this command in cmdlet
- Get-MailboxExportRequest
Import Mailbox
Apply this command to import pst content in mailbox under Exchange Server 2013 environment.
New-MailboxImportRequest –Mailbox <alias name> -FilePath <UNC File Path>
Example: New-MailboxImportRequest –Mailbox Smith –FilePath \\WIN8\2013Data\Jonathan.PST
Also, we can check the status using these commands:
- Get-MailboxImportRequest
- Get-MailboxImportRequest | Get-MailboxImportRequestStatistics
Conclusion:
We performed Export / Import Mailbox task via using Exchange Admin Center (EAC) & Exchange Management Shell in Exchange Server 2013 environment and with proper steps & accurate permission rights we turn the task easier and faster.
But if you still unable to perform Export Import procedure in Exchange Server 2013 environment or if you face any problem during Export / Import task because of database corruption, mailbox corruption etc then you can view this post https://plus.google.com/115112572193304560946/posts/a6Ft72Z5RLF, it will help to export & import content from mailboxes even in the corruption stages.


No comments:
Post a Comment
Note: only a member of this blog may post a comment.